Read Building Web Sites All-in-One For Dummies® Online
Authors: Claudia Snell
Building Web Sites All-in-One For Dummies® (64 page)

Using the Photoshop Save for Web & Devices command
Photoshop CS4 gives you all the tools you need to create pixel-perfect images for print as well as for the Web. The Web has different considerations, though. First and foremost, you must choose the right file format. The next step is to optimize the image â or, if you've used the Slice tool, optimize each slice.
To optimize JPEG images you created in Photoshop CS4 for the Web, follow these steps:
1.
Choose File
â
Save for Web & Devices.
2.
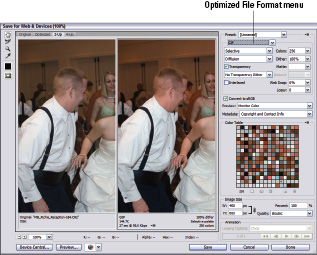
In the Save for Web & Devices dialog box that appears, click the 2-Up tab.
This option enables you to compare the original image with the optimized version (see Figure 4-11).
Figure 4-11:
Optimizing is so easy when you use the Save for Web & Devices command.
3.
Select the Slice Select tool.
The tool allows you to select individual slices in the image and apply different optimization settings to each slice. Steps 3 and 4 are necessary only if you created slices in the image and intend to use different optimization settings for each slice.
4.
In the optimized section (the bottom or right section when you're viewing the image in 2-Up mode), click the slice you want to optimize.
5.
Choose the desired optimization setting from the Optimized File Format drop-down menu (see Figure 4-12).
For the first slice of this image (which is text), the ideal format is GIF, which is ideal for areas of an image that have large areas of solid color. We show you everything you need to know about optimizing GIF artwork in Photoshop in the next section. For more information on file formats, see Chapter 1 of this minibook.
6.
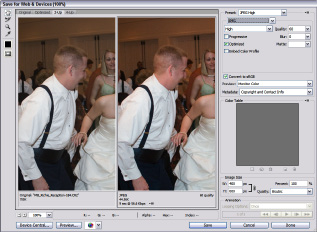
To optimize an image using the JPEG format, choose JPEG from the Optimized File Format drop-down menu.
When you choose JPEG, the options shown in Figure 4-13 appear. The default JPEG setting is Maximum when you create an image from scratch in Photoshop; and the Quality is 100 percent, which results in a squeaky-clean-looking image but is way too big for a Web site. You can modify the Quality setting and other applicable settings as outlined in the next step.
Figure 4-12:
Choose the desired optimization method.

Figure 4-13:
Optimizing an image, using the JPEG format.
7.
Modify the following parameters if desired:
Quality:
Enter a value or click the arrow and drag the scrubby slider. Higher values apply less compression, resulting in a better-looking image albeit at the expense of a larger file size. Lower values apply higher compression, resulting in a smaller file size with poorer image quality. You can tell the optimal setting for an image by comparing the original in the left pane if your image is portrait (as shown in Figure 4-13), or in the bottom pane if your image is landscape, with the compressed version in the right pane. When image degradation is noticeable, specify a higher value.
Progressive:
Downloads the image into the user's browser in multiple passes. This option enables the visitor to see a low-resolution version of the image as soon as the page loads. The optimized version appears when the image finishes loading.
Blur:
If you have to apply heavy compression to achieve the desired file size, enter a value or drag the Blur scrubby slider to blur the image and minimize the appearance of jagged edges.
Matte:
Specifies a color to fill pixels that were transparent in the original image. Choose an option from the Matte drop-down menu. Your choices are
⢠None:
Choose this option when you don't want to specify a matte color.
⢠Eyedropper:
Choose this option, and then click the Matte Color Swatch below the Eyedropper tool on the left side of the dialog box to choose the fill color from the Color Picker.
⢠Foreground Color:
Choose this option and the current foreground color becomes the matte color.
⢠Background Color:
Choose this option and the current background color becomes the matte color.
⢠White:
Fill transparent pixels with white.
⢠Black:
Fill transparent pixels with black.
â¢
Other:
With this, you can select a matte color from the Color Picker.
Embed Color Profile:
Embeds the current color profile with the saved file. We recommend against this option; leave it unchecked and use the Convert to sRGB option described in the next step. If the current color profile is anything other than sRGB and you embed it, the image won't display properly on a computer monitor.
8.
Make sure you leave the Convert to sRGB option enabled.
If your image was captured from a digital camera using the Adobe RGB color profile, or if you converted the image to the Adobe RGB color profile, you definitely need to have the resulting image converted to sRGB because the Adobe RGB color profile cannot accurately be displayed outside Photoshop CS4.
9.
Choose an option from the Preview drop-down menu.
Your choices are Monitor Color, Macintosh (No Color Management), Windows (No Color Management), or Use Document Profile. In most cases, the default Monitor Color options works best.
10.
Choose an option from the Metadata drop-down menu.
Your options are None, Copyright, Copyright and Contact Info, All Except Camera Info, or All. Digital cameras add
metadata
to an image when a picture is taken. The information includes the camera make and model, exposure information, and so on. The photographer might have also added copyright and contact info in Photoshop, Photoshop Lightroom, or a similar image-editing application. If the image was supplied by a photographer, leave his contact and copyright image with the optimized image. Adding the camera data isn't necessary.
11.
Choose the desired options in the Image Size section.
You can resize the image proportionately by entering a value in the W or H text field. We don't advise clicking the link icon, which makes it possible to resize the width and not the height, or vice versa. This distorts the image. You can also resize the image by change the value in the Percent text field, or by dragging the Percent scrubby slider. If you resize the image, you can choose an option from the Quality menu. In most cases, the Bicubic option works well.
12.
Click Save.
The Save Optimized As dialog box appears.
13.
Choose the desired option from the Save As Type drop-down menu.
If you're saving an image for a banner, accept the default Images Only option. If you sliced the image, choose HTML and Images to save an HTML file and image files in the specified file formats.
To optimize GIF images in Photoshop CS4, follow these steps:
1.
Choose File
â
Save for Web & Devices.
The Save for Web & Devices dialog box appears.
2.
Select an option from the Preset drop-down menu.
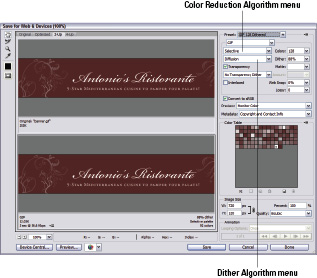
Your choices are GIF Dithered; GIF No Dither with a palette of 128, 64, or 32 colors; or GIF Restrictive. If you created your design using colors from the Web-safe palette, choose one of the No Dither options. Choose one of the Dithered options to export the image with Web-safe colors. Any nonâWeb-safe colors in your design are mixed (dithered) using colors from the Web-safe palette. GIF Restrictive pulls colors from the Web-safe, 216-color palette. Figure 4-14 shows the Save for Web & Devices dialog box after choosing the GIF 128 Dithered preset.
3.
Select an option from the Color Reduction Algorithm drop-down menu.
The Color Reduction Algorithm determines the method by which the colors for the image palette are created. Your choices are
⢠Perceptual:
Creates a color table by giving priority to colors for which the human eye has greater sensitivity.
⢠Selective:
The default option creates a color table similar to that created by using the Perceptual algorithm, but it preserves large areas of color in the original image and also Web-safe colors. This algorithm creates a color palette that closely resembles the original image.
Figure 4-14:
Optimizing an image using the GIF 128 Dithered option.
⢠Adaptive:
Creates a color table using the predominant color spectrum in the image. If you're optimizing an image that's predominantly red and orange, the color table is made up primarily of reds and oranges. Choose this algorithm if the image you're optimizing is made up of similar color hues.
⢠Restrictive:
Creates a color palette using colors from the Web-safe, 216-color palette.
⢠Custom:
Creates a color palette that you create or modify. If you open a previously saved GIF or PNG-8 file, it will have a custom color palette.
⢠Black and White:
Creates a color palette comprising black and white. Use this algorithm to save images that will be displayed on PDAs (personal digital assistants) that can't display color.
⢠Grayscale:
Creates a color palette comprising 256 shades of gray from solid black to white. This is similar to how black-and-white film photos display.
⢠MAC OS:
Creates a color palette based on the colors from the Mac operating system (OS) color palette.
⢠Windows:
Creates a color palette based on the colors from the Windows OS color palette.
4.
Modify the number of colors in the palette.
You can modify the number of colors by choosing an option from the drop-down menu. When you change the number of colors, you see the results in the Color Table. When you reduce the number of colors in the palette, pay careful attention to the optimized image. If you specify a color palette that doesn't have enough colors, image degradation occurs. If this is the case, choose a higher value that doesn't result in image degradation.